Azure Pipelines for Private AKS Clusters
Creating private AKS clusters is a good step in hardening your Azure Kubernetes clusters. In this post I walk through the steps you’ll need to follow to enable deployment to private AKS clusters.
Azure Kubernetes Service (AKS) Clusters are amazing - all the power of Kubernetes (K8s) without the hassle of a full tin-based installation. However, by default the management plane, or k8s API, is public. If you want to harden your cluster, one sensible step would be to prevent public access to the management API by making your cluster private.
Note: There are many other steps you should take to truly harden your cluster, so making your cluster private alone does not guarantee a secure cluster!
However, this comes at a price. If you do this, then you can only access the API from a VNet that has a private link to the AKS cluster. That means that you cannot deploy to the cluster from an Azure Pipelines hosted agent (since the agent is coming in to the cluster from the internet).
Furthermore, you probably want to make your Azure Container Registry (ACR) private too. Once again this step comes with additional overhead: you can only push/pull to/from this ACR from the VNet, so hosted agents won’t work.
Private Agents
Fortunately, we can provision private agents for deployments. The procedure is as follows:
- Create a VM on a VNet that has the private link to the AKS cluster so that the VM can reach the private endpoint for the cluster API.
- Create an agent pool inside of Azure DevOps (AzDO).
- Download the AzDO pipelines agent and register it to the agent pool.
- Target the agent pool in your pipelines.
You can (of course) do this manually, but if you’re using Terraform, then you can use the following code to spin up a VM and execute a custom script that will register the agent:
    resource "azurerm_linux_virtual_machine" "devopsvm" {
      name = var.devops_vm_name
      resource_group_name = azurerm_resource_group.azdorg.name
      location = azurerm_resource_group.azdorg.location
      network_interface_ids = [azurerm_network_interface.azdovmnic.id]
      size = "Standard_DS1_v2"

      os_disk {
        name = "${var.devops_vm_name}_osdisk"
        caching = "ReadWrite"
        storage_account_type = "Standard_LRS"
      }

      source_image_reference {
        publisher = "Canonical"
        offer = "UbuntuServer"
        sku = "18.04-LTS"
        version = "latest"
      }

      computer_name = var.devops_vm_name
      admin_username = var.agent_user
      disable_password_authentication = true

      admin_ssh_key {
        username = var.agent_user
        public_key = tls_private_key.azdossh.public_key_openssh
      }

      tags = var.tags
    }
Note: I’m not showing all the resources here, just the main VM resource. This is spinning up an Ubuntu 18.04 VM and attaching it to the VNet that has my AKS cluster private link.
Once you have the VM defined, you need to add a custom extension:
    resource "azurerm_virtual_machine_extension" "installtools" {
        name = "customconfig"
        virtual_machine_id = azurerm_linux_virtual_machine.devopsvm.id
        publisher = "Microsoft.Azure.Extensions"
        type = "CustomScript"
        type_handler_version = "2.0"
        protected_settings = <<SETTINGS
        {
          "script" : "${base64encode(templatefile("${path.module}/install_tools.sh", {
            AGENT_USER = var.agent_user
            AGENT_POOL = "${var.agent_pool_prefix}-${var.environment}"
            AGENT_TOKEN = var.agent_token
            AZDO_URL = var.azdo_url
          }))}"
        }
        SETTINGS
        depends_on = [azurerm_linux_virtual_machine.devopsvm]
    }
The trick here is to invoke a script (install_tools.sh) with the args that it requires, namely the agent user name and token, the agent pool and the AzDO account URL.
Note: The token is a Personal Access Token (PAT) that has permissions to administer the agent pool.
Let’s have a look at the install_tools.sh script:
    #!/bin/bash
    agentuser=${AGENT_USER}
    pool=${AGENT_POOL}
    pat=${AGENT_TOKEN}
    azdourl=${AZDO_URL}

    # install az cli
    curl -sL https://aka.ms/InstallAzureCLIDeb | sudo bash

    # install docker
    sudo apt install -y apt-transport-https ca-certificates curl software-properties-common
    curl -fsSL https://download.docker.com/linux/ubuntu/gpg | sudo apt-key add -
    sudo add-apt-repository "deb [arch=amd64] https://download.docker.com/linux/ubuntu bionic stable"
    sudo apt update
    sudo apt install -y docker-ce
    sudo usermod -aG docker $agentuser

    # install kubectl
    curl -s https://packages.cloud.google.com/apt/doc/apt-key.gpg | sudo apt-key add
    sudo apt-add-repository "deb http://apt.kubernetes.io/ kubernetes-xenial main"
    sudo apt update
    sudo apt-get install -y kubectl

    # install helm
    curl -o helm.tar.gz https://get.helm.sh/helm-v3.3.4-linux-amd64.tar.gz
    tar zxvf helm.tar.gz
    sudo mv linux-amd64/helm /usr/local/bin/helm
    rm -rf linux-amd64
    rm -f helm.tar.gz

    # download azdo agent
    mkdir -p /opt/azdo && cd /opt/azdo
    cd /opt/azdo
    curl -o azdoagent.tar.gz https://vstsagentpackage.azureedge.net/agent/2.175.2/vsts-agent-linux-x64-2.175.2.tar.gz
    tar xzvf azdoagent.tar.gz
    rm -f azdoagent.tar.gz

    # configure as azdouser
    chown -R $agentuser /opt/azdo
    chmod -R 755 /opt/azdo
    runuser -l $agentuser -c "/opt/azdo/config.sh --unattended --url $azdourl --auth pat --token $pat --pool $pool --acceptTeeEula"

    # install and start the service
    ./svc.sh install
    ./svc.sh start
This script will:
- Set the variables - the tokens like
${AGENT_USER}are injected when the Terraformtemplatefilefunction is invoked in the custom extension above - Install tools such as
az cli,docker,kubectlandhelm - Download and untar the AzDO private agent
- Run a silent config command to register the agent to the agent pool - I do this using
runusersince this command cannot be run as root (which is the context when Terraform/Azure executes the custom script extension) - Install and start the agent service
Note: if you’re using ARM templates to deploy your VM, then you can still use the
install_tools.shscript using the ARM custom script extension. You’ll have to change how the parameters are handled though.
To use this agent in a YML pipeline, just set the pool property to the name of the pool you registered the agent to:
    jobs:
    - job: Build
      displayName: Build
      pool: my-private-pool
      steps:
      - script: echo Hello from private agent!
Now you can push/pull to/from your private ACR - as long as the build runs on the private agent, just use the docker tasksas per normal.
Deploying to Private AKS
Now that we have a private agent, we can deploy to the AKS cluster. However, there are a couple further steps required, especially if we want approvals(which you do!).
For public AKS cluster, you can create a Pipeline Environment in AzDO and add a Kubernetes resource. Under the hood AzDO will query the namespaces of the target cluster so that you can select a namespace for the environment, as well as for querying workloads (services, deployments and pods) within the cluster. However, if you try this for a private cluster, you’ll get an error: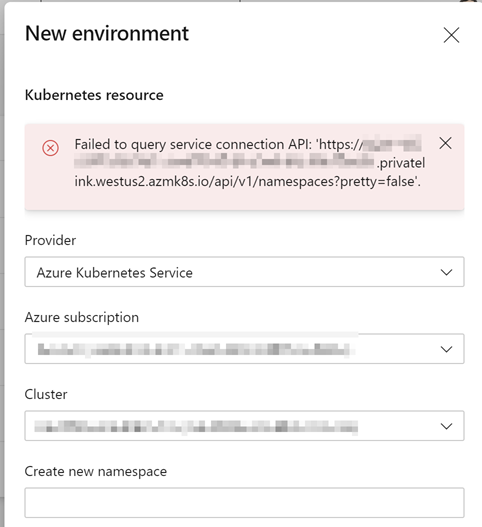
You can see the URL to the cluster API has .privatelink in it - so this makes sense. AzDO is unable to connect to the AKS API.
To work around this, we need to:
- Create a
genericenvironment for approvals - Create a Kubernetes service connection for connecting to the cluster using
kubeconfig
To create the environment, navigate to Pipelines->Environments and add a new environment. Simply select None for the resource type: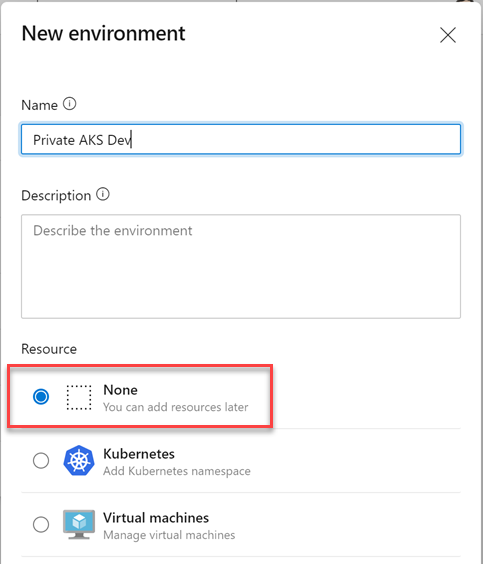
generic AzDO environment
Now you can define approvals and/or gates (checks) on the environment as you would for any other environment.
Create a Generic k8s Endpoint
Next we have to create a k8s service endpoint. The service endpoint allows you to abstract authentication from your pipelines - as long as the person that initiates the pipeline has access to use the endpoint (you can configure endpoint security) then they just specify the endpoint name - the authentication is handled under the hood.
If you try to create a service connection to a public AKS cluster, you can use the dialog and it will confirm connectivity and show namespaces etc. - but we can’t in this case for the same reason as the environment above - the API is private!
That means that we have to fall back on creating a generic k8s endpoint using a kubeconfig. When we use this connection, AzDO will download the kubeconfig and issue kubectl config use-context for the specified context, so that we’re ready to issue subsequent commands.
To extract your cluster’s kubeconfig you’ll need to connect to a VM in the VNet. You can then use az cli to login and then get the credentials for the AKS cluster:
    # login to azure
    az login

    # login to the AKS cluster
    az aks get-credentials -n <cluster_name> -g <cluster_resource_group_name>
At this point, you can just copy the ~/.kube/config file.
Now navigate to your Azure DevOps account and Team Project. Click on the gear icon to go to project (not account) settings. Click on Service connections and then click the New Connection button.
Select Kubernetes from the connection type and click Next: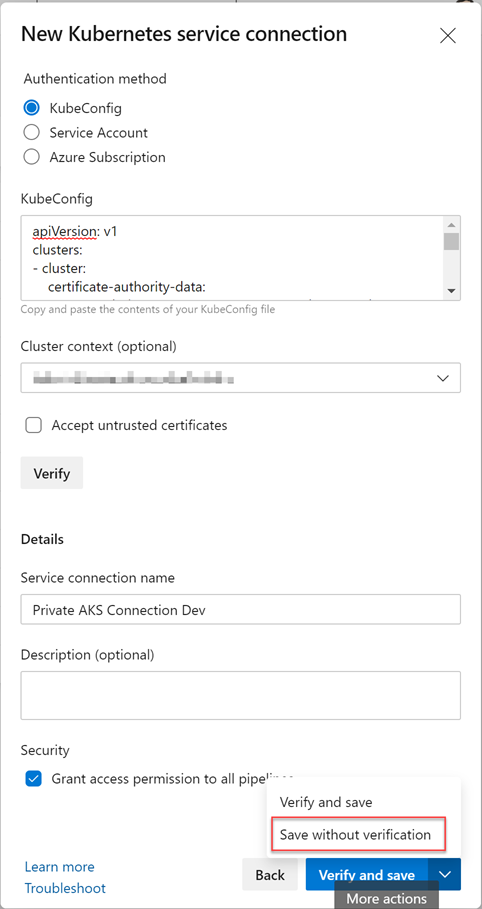
KubeConfig Service Connection
Fill out the form as follows:
- Change the type to
Kubeconfig - Paste your
kubeconfigfile into theKubeConfigfield - Select the correct
contextfrom the dropdown (values will be filled in from the parsedkubeconfigfile - Enter a
nameand (optional)description - Clicking
Verifywill fail (because the API is private!) so you have to selectSave without verificationfrom the button menu to save the connection.
Note: I initially did a
catof thekubeconfigand pasted it - this didn’t work since the copy command inserted newlines in the certs inside the file. I had to clean the value so that it was validkubeconfigyml.
We now have a generic environment for approvals and a kubeconfig service connection for authentication to the cluster!
The Pipeline
We can now make use of the environment and service connection in our pipelines. Here is a snippet showing that:
    stages:
    - stage: dev
      displayName: DEV
      jobs:
      - deployment: deploy
        displayName: Deploy
        pool: my-private-pool
        environment: 'Private AKS Dev'
        strategy:
          runOnce:
            deploy:
              steps:
              - checkout: self
              - task: HelmDeploy@0
                displayName: Helm Deploy app
                inputs:
                  connectionType: 'Kubernetes Service Connection'
                  kubernetesServiceConnection: 'Private AKS Connection Dev'
                  namespace: 'dev'
                  command: upgrade
                  chartType: FilePath
                  chartPath: '/path/to/chart'
                  releaseName: 'release-name'
                  valueFile: '/path/to/value/file'
                  arguments: '--create-namespace'
On line 7, we’re specifying the private agent pool so that this pipeline stage runs on the private agent. On line 8 we specify the environment we created earlier - if there are any approvals and/or gates configured for this environment, the stage would only proceed once the approvals and gates have passed. On line 17 we specify that the helm task should authenticate via a Kubernetes Service Connection and we specify the connection name in line 18.
Of course if you were using the Kubernetes manifest task, the same principles would apply.
Conclusion
Creating a private AKS cluster makes sense when hardening your cluster. However, it does make deployment challenging. However, by creating a private agent, a generic environment and a kubeconfig service connection, you can still deploy to the cluster securely. Be aware that you are not going to be able to see the workloads (services, deployments, pods etc.) in AzDO like you can with a public AKS Environment. Hopefully you have Container Insights configured anyway, so this shouldn’t be a huge concern.
Happy private kube’ing!